What Is Astro and Should You Use It for Your Project?🚀
Learning this framework early may give you a professional edge

React, Vue, and other frameworks have dominated the frontend framework atmosphere for a while now. These frameworks are great and are supported by thousands of developers. But, what if I told you there was a framework that supported those libraries, compiled them together, stripped away unused JavaScript, and shipped them server-first and fast? Astro is that framework.
Chris Ferdinandi, “The Vanilla JS Guy”, discussed the benefits of Astro in a recent interview. He mentioned learning React and Vue are still great investments of time, but learning Astro now could also give you an edge a couple of years from now. React and Vue are probably not going anywhere anytime soon, but Astro is at the forefront of the new wave of web frameworks. The interview was enough to convince me to take a look at Astro. I completed their tutorial (which I highly recommend) and I must admit, I’m a fan.
Most of the projects that I do in my spare time don’t really require all of the features that React offers. Astro is great for content-focused sites like blogs, portfolios, and e-commerce sites. I’m excited to highlight some of Astro's cool features to help you determine if it's a framework you'd like to explore. Before that, let’s go over a couple of quick details and the pros and cons of Astro.
Overview of Astro ☄️
Astro is a server-first framework. This means that it uses server-side rendering over client-side rendering (what React uses) as much as possible. Astro has the benefits of server-side frameworks like PHP or WordPress, but everything is still just HTML, CSS, and JavaScript, so the learning curve is pretty low.
Astro also uses an MPA (Multi Page App) approach. SPAs (Single Page Apps) are great if it fits your use case, but a SPA usually has worse Time to Interactive (TTI) metrics and performance. Astro’s main focus is being fast. In fact, their goal is: “It should be nearly impossible to build a slow website with Astro.” An example in their docs mentioned that the same site built with the most popular React web framework can load 40% faster with 90% less JavaScript when built with Astro. 🤯
Those kind of stats are amazing and was what really drew me to try out Astro. As I mentioned earlier, one of the coolest parts of Astro is that it supports many popular UI component languages. This means you can explore and play with React, Svelte, Vue, and others without fully committing to them. Astro can be a great tool to find out which UI component language you like. You can check out the list of 100+ supported integrations here. Astro also has a built-in component language that allows you to create great content-focused sites right out of the box.
Pros and Cons ⭐
I’ve talked a lot about how great Astro is already, but what are its downsides? When should you use Astro? Let’s answer those questions with a quick pros and cons breakdown.
Pros:
- Comes with everything you need to build a great website that performs fast. Includes file-based routing, data-fetching, asset handling, and much more.
- You can use Astro with other popular frameworks (React, Preact, Svelte, Vue, and more). You can also use more than one in the same project!
- Server-first API design and no JS runtime to slow your site down.
- “Astro’s goal is to be accessible to every web developer.” The framework is easy to pick up and create a project in.
- Astro also offers Markdown support (I'll go into more detail on this later)
Cons:
- Not ideal for creating application-like experiences. If you want to create admin dashboards, social networks, or a to-do lists app, this might not be the framework for the project. Astro’s focus is on content-rich websites.
- When compared to popular frameworks like React, there are not as many tools and resources available...yet. The developer community is just starting, although I've heard the Astro Discord community is very active.
- It might not be used in the workplace for a couple of years, or at all. Only time will tell.
If you noticed any pros and cons not listed here after playing around with Astro, let me know, and I’ll add them to the list. Overall, I think Astro is worth learning, but not as your first framework. I would recommend learning React, Vue, Angular, or another popular framework before diving into Astro. It’s not an in-demand professional skill yet, but it might be soon. Getting a head start when you have the time is always a good idea!
Astro Components 🌠
This article will not be a tutorial (I recommend doing the official Astro tutorial instead), but rather an overview of some of Astro's many features that stood out to me. We'll start with Astro components to give you an idea of the layout of Astro projects and what you can expect.
If you've done a project in React, the syntax of an Astro component may look familiar. It was designed to be easy to pick up for anyone with experience writing HTML or JSX. An Astro component is a snippet of reusable UI that will convert to HTML during your build. Let's take a look at an example navigation component.
---
import Hamburger from "./Hamburger.astro";
const { links } = Astro.props;
const visible = true;
const siteTitle = "My Astro Site";
const logo = "../images/logo.png";
---

<nav>
    <Hamburger/>
    {visible ? <img src={logo}/> : <h1>{siteTitle}</h1>}
    {links.map((link) => (
        <a  class="nav-link" href={link.path}>{link.title}</a>
    ))}
</nav>
You might notice a couple of things. First, unlike React, Astro uses the class naming structure. You may have also noticed the code fence (---). Astro uses this to identify the component script. This concept was inspired by the Markdown concept, frontmatter. In the frontmatter you can import other Astro components, import data, fetch content from an API, create variables to be used in your template, import React, and more. If you need more information on component scripts vs component templates, read this part of the docs. Below the component script is the component template. This will house the HTML output of the component.
So for this component, we imported another component, Hamburger, received props, and set a couple of variables to be used inside of the nav element. Logical operators can be used to produce dynamically-generated HTML. So depending on the value of visible, either a logo or a site title will display. This component also dynamically creates multiple nav link elements by mapping through links.
This would be a great component to use alongside a layout, a reusable Astro component that serves as a template.
Layouts and Pages 🛸
Layouts and pages are some of my favorite parts of the Astro framework. Layouts are great for creating blog templates, project pages, and documentation. An Astro layout is just a page shell, partial or full, with a <slot/> to specify where unique page content should be injected. You can also use multiple layouts at a time.
For this example I will reference the BaseLayout and MarkdownPostLayout from the Astro tutorial.
---
import Header from '../components/Header.astro';
import Footer from '../components/Footer.astro';

import '../styles/global.css';

const { pageTitle } = Astro.props;
---

<html lang="en">
    <head>
        <meta charset="utf-8" />
        <link rel="icon" type="image/svg+xml" href="/favicon.svg" />
        <meta name="viewport" content="width=device-width" />
        <meta name="generator" content={Astro.generator} />
        <title>{pageTitle}</title>
    </head>
    <body>
        <Header />
        <h1>{pageTitle}</h1>
        <slot/>
        <Footer/>
        <script>
             import "../scripts/menu.js";
        </script>
    </body>
</html>
As you can see, you can import components and variables and use vanilla JS scripts. Anything you can do with an Astro component, you can do with a Layout component. The main difference here is the <slot />. The <slot/> is a placeholder for any external HTML content that you want to inject from other files that you pass as child elements.
You can also name slots. Let's say you want create a blog template and want a slot that contains tags after the footer and a slot before the blog content that contains an image. You might do the following in your layout file:
---
import Header from "./Header.astro";
import Footer from "./Footer.astro";
const { pageTitle } = Astro.props;
---
<div>
    <Header />
    <slot name="blog-image"/>
    <h1>{pageTitle}</h1>
    <slot/>
    <Footer/>
    <slot name="blog-tags"/>
</div>
And the following in your blog page file:
---
import BasicLayout from "../layouts/BasicLayout.astro";
---

<BasicLayout pageTitle="My Blog Page">
    <img src="../images/cool-image.png" slot="blog-image"/>
    <h2>My Post</h2>
    <p>Content here</p>
    <p slot="blog-tags">My post tags here will display after the footer</p>
</BasicLayout>
To get something like this:
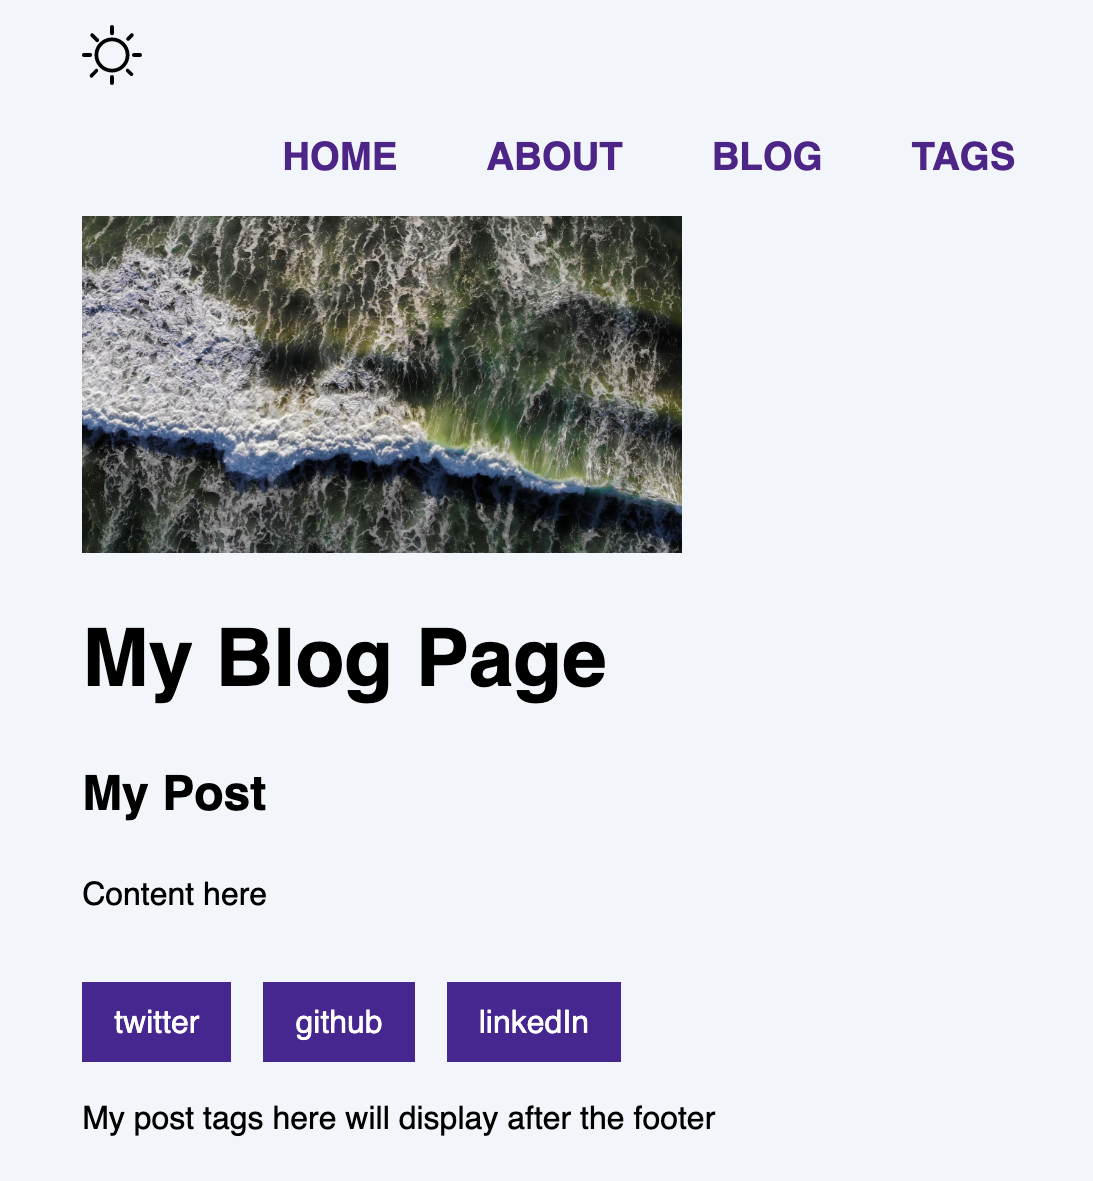
Cool, right!? 🚀 If you don't have any matching children passed to a slot, you can also set fallback content. The <slot/> will render its own children you set as a placeholder in that scenario. Just add this to the above layout example:
    <slot name="blog-tags">
        <p>This will render if no children were passed to this slot. :)</p>
    </slot>
Let's dive into how you can harness the power of pages with layouts.
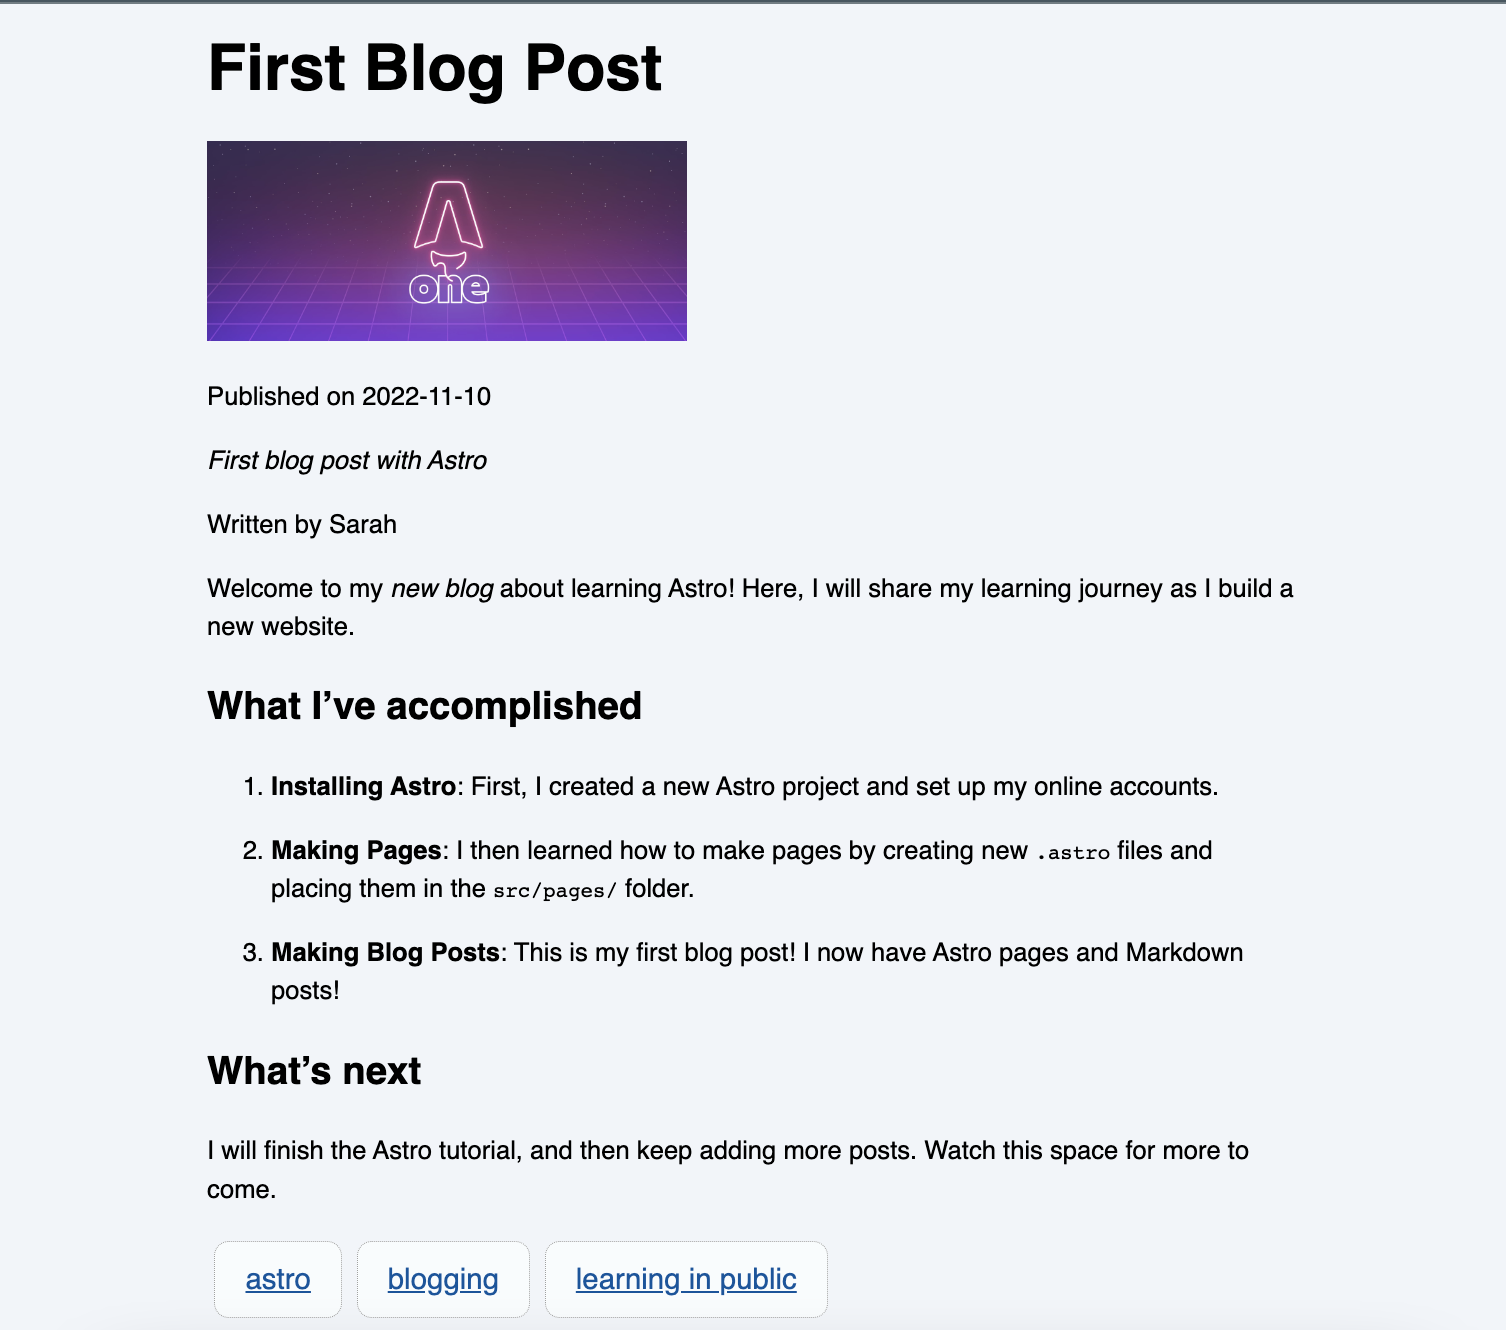
Astro uses file-based routing so each file in your src/pages directory automatically becomes an endpoint based on its file path. See the full list of supported page files here. The feature that stood out to me most was using layouts with .md or .mdx pages so this overview will focus on that. When you use Markdown files with Astro, you are able to designate a layout and use variables. The draft: true is an optional value, that if true, this page will be excluded from the site build. Check it out in the example below:
---
layout: ../../layouts/MarkdownPostLayout.astro
title: 'First Blog Post'
pubDate: 2022-11-10
description: 'First blog post with Astro'
author: 'Sarah'
image:
    url: 'https://astro.build/assets/blog/astro-1-release-update/cover.jpeg'
    alt: 'The Astro logo with the word One.'
tags: ["astro", "blogging", "learning in public"]
draft: false
---

Welcome to my _new blog_ about learning Astro! Here, I will share my learning journey as I build a new website.

## What I've accomplished

1. **Installing Astro**: First, I created a new Astro project and set up my online accounts.

2. **Making Pages**: I then learned how to make pages by creating new `.astro` files and placing them in the `src/pages/` folder.

3. **Making Blog Posts**: This is my first blog post! I now have Astro pages and Markdown posts!

## What's next

I will finish the Astro tutorial, and then keep adding more posts. Watch this space for more to come.
After you create this file, Astro will automatically create a page with the MarkdownPostLayout and all of the frontmatter values will be passed to that layout as props creating the following:
If you want to take things a step further you can add the MDX integration to your project. The MDX integration allows you to use JSX variables, expressions, and components! This might be a great idea if you have button components or interactive components that you'd like to add to a blog post.
If you want to display all of your blog posts on one page, all you need to do is take advantage of Astro.glob(). Astro.glob() takes one param, a "glob pattern" that matches local files (in our case ../pages/posts/*.md). This is an async function that will return an array of each file's exports. So, you can get all of your posts with this one line: const allPosts = await Astro.glob('../pages/posts/*.md'); and display them like so:
<ul>
    {allPosts.map((post) => <BlogPost url={post.url} title={post.frontmatter.title}/>)}
</ul>
This can potentially be very powerful depending on your use case!
Astro Islands 🛰
"Islands" are a main feature of Astro. An island is an interactive UI component on a static page of HTML. You can have multiple islands, but islands always render individually. Let's say you built a component with React. Astro will render that component to HTML and strip out all of the JS to make your site really fast by default. If you need that component to be interactive, you will create an island of interactivity. The island example below is a React component that generates a greeting each time you click a button. You must add client:load for Astro to rerun the JS to the client when the page loads. This is what will make the component "hydrated" or interactive.
---
import Greeting from '../components/Greeting';
---
 <Greeting client:load messages={["Hola", "Whaddup", "Konnichiwa"]} />
Astro also offers lazy loading with the client: visible directive. If you add that directive to a component, that component's JS will only be sent to the client when it is visible on the page. Convenient, we love fast sites and easy lazy loading! ✨
Styling in Astro 🪐
It's worth mentioning as my last highlight how easy styling is in Astro. <style> CSS rules are automatically scoped by default . So any styles you write in a component file will only be applied to that exact component. This also allows you to use low-specificity selectors when writing component CSS, because the styles will be compiled with scopes in the final output.
If you prefer to write in Sass, it's ridiculously easy to add that integration. Just install it and add lang="scss" to the component style tag:
<style lang="scss">
  @use "../styles/variables" as v;

  figure {
    margin: 0px;
    padding: 0px;
  }

  blockquote {
    margin: 0px 0px 10px;
    padding: 5px 10px;
    background: v.$light-background;
    color: v.$body-text-color-alternate;
    border-left: 5px solid v.$main-theme-dark;
    max-width: 500px;
  }
</style>
These scoped styles take precedence over other styles of the specificity. So if you have a global stylesheet that declares all h1s to be orange and a component style that declares all h1s in that component should be purple, the h1s in that component will be purple. Basically, scoped styles win over imported stylesheets.
You can dive into the nitty gritty of the cascading order in the docs. So far, I've found that writing CSS in Astro has been a breeze. In my opinion, the component scoping is convenient and practical.
Wrap Up: Should You Use Astro? 🔭
I'm currently working in Astro to develop a new version of my portfolio. I think it is a great framework for projects like that and especially for blogs. I also think it is great that you can use the framework with your React and Vue project, but it will ship faster! The learning curve for Astro is also relatively low thanks to the familiar JSX and HTML syntax. For application-like projects, you may be better off with a different framework.
This article is already quite long, but I didn't have a chance to dive into all of the cool features. I highly recommend perusing through the Astro Docs and completing the tutorial to make your final decision on whether this framework is for you.
What do you think of Astro? Do you think it will gain traction in the developer world? Let me know what you think!


