Create a Twitter Bot With Python
Learn how to host and create a bot with the Twitter API before Twitter's demise

⭐️ Update 05/2023 - Twitter has suspended my bot. They have also started charging for their basic API. You should still be able to use this tutorial for the free access, but like many developers, I am disgruntled and disappointed with Twitter. I do not have the energy and patience to contact support over this. ⭐️

A couple of weeks ago (before all of Elon's horrible decisions and takeover) I set out to make a Twitter bot and quickly found out that a lot of tutorials out there contain outdated information. Many of them use an old version of Tweepy, a Python library for accessing the Twitter API. Tweepy basically makes using the Twitter API (notorious for confusing documentation) easier. Tweepy is great, but unfortunately, the newest version doesn’t allow for image uploading. So for this tutorial, we will be working with the Twitter API directly. All this means is some extra lines of code.
I'm not very hopeful about the future of Twitter, but if you want to create a bot to annoy Elon Musk, then this tutorial is for you. So, pour yourself some tea and put on some lo-fi, and let’s create a bot! 🐶

Prerequisites and External Libraries
There are a couple of prerequisites before we begin. You will need the following:
A Twitter account for your bot. I also recommend creating a throw-away account to help test your bot too.
A Twitter developer account. You will need to apply for elevated access to use the Twitter API v2. More on this later.
We will be hosting the bot using AWS. Create a free account with them.
Make sure Python 3 is already installed on your machine.
Install these Python libraries:
Requests - used to make HTTP requests to the different APIs.
Requests_oauthlibwill be used to create our authentication session to access the Twitter API.Flask - used to create a web app for deployment on AWS (Elastic Beanstalk)
APScheduler - Schedules when the bot will post a tweet and check for mentions.
$ pip install requests
$ pip install requests requests_oauthlib
$ pip install -U Flask
$ pip install APScheduler
Applying for Elevated Access and Getting Your API Credentials
You will need four credentials to be able to access the Twitter API.
An API Key
An API Secret
An access token
An access secret
Let’s go over how to get those and how to apply for elevated access. First, create or log in to your bot’s Twitter account.
Go to the Twitter Developer Platform and click on Sign Up. Enter your credentials if prompted.
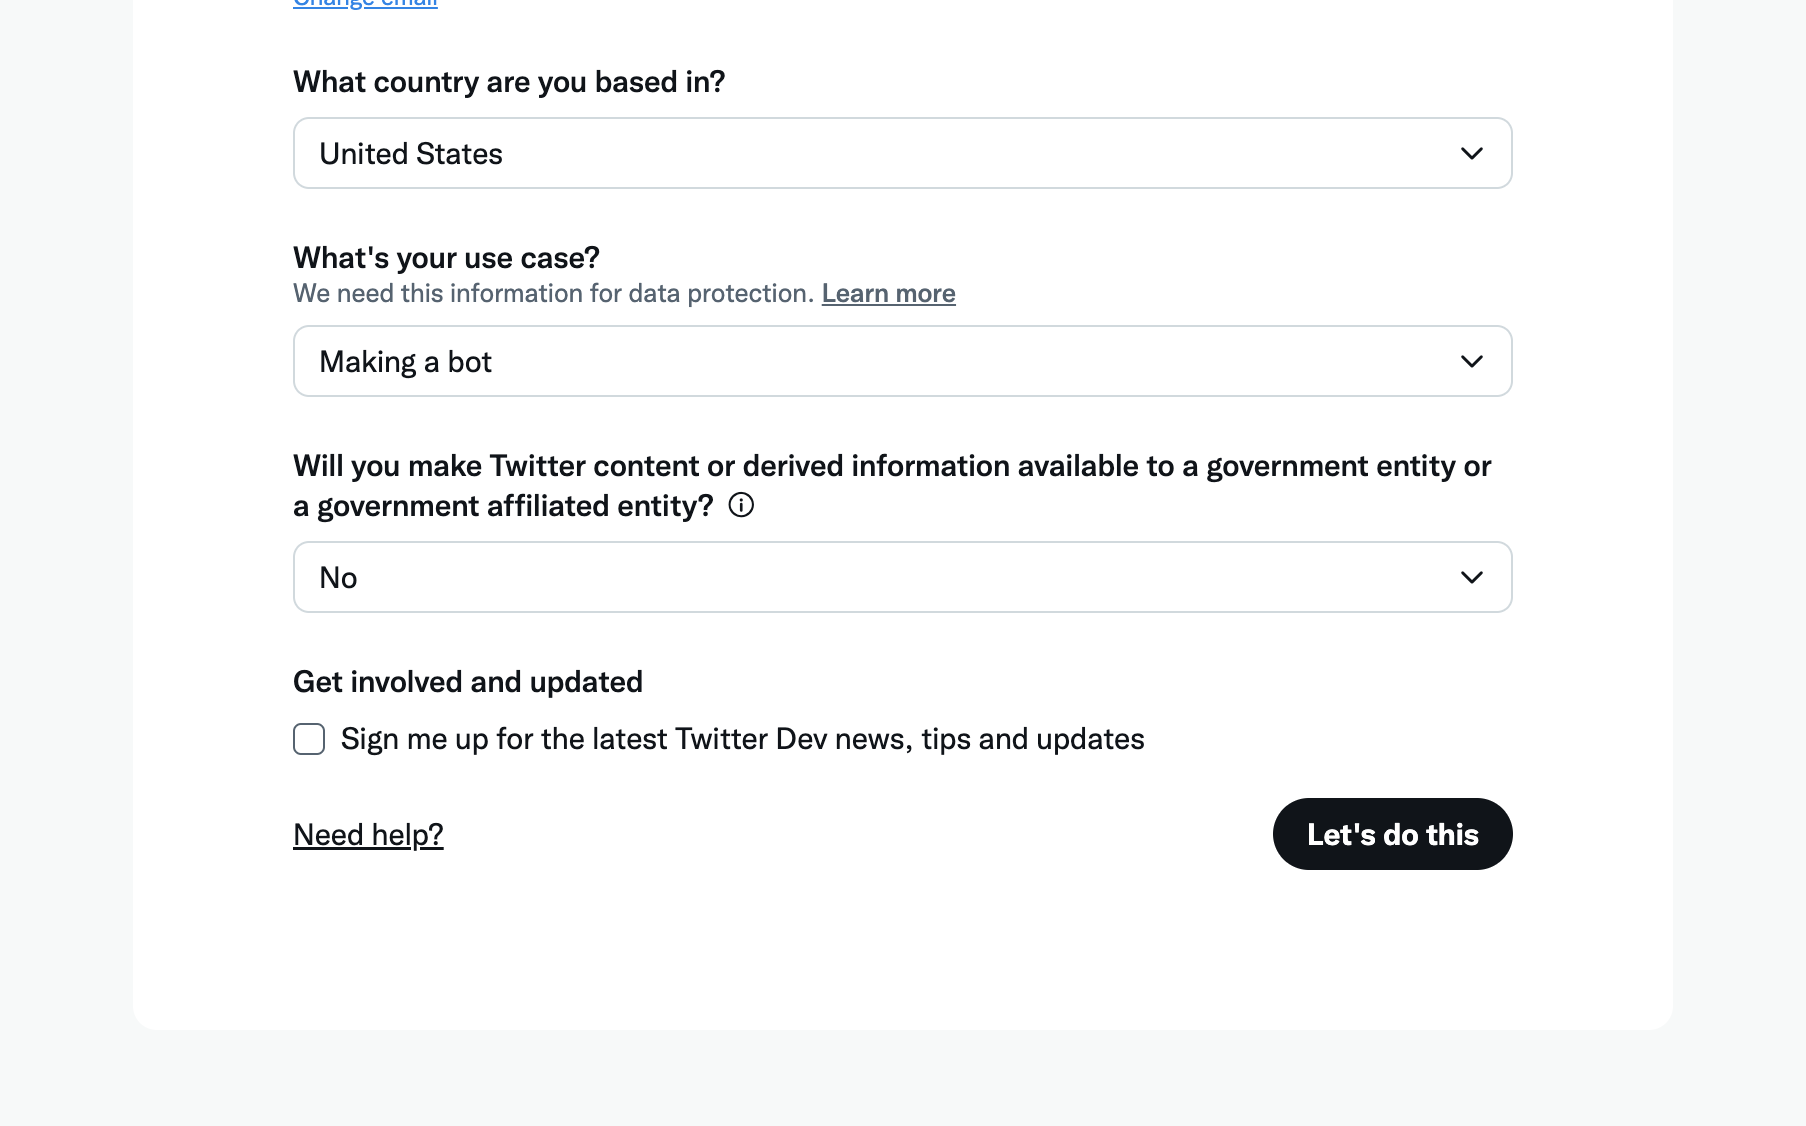
Continue through the sign-up process. Set your use case to “making a bot” and answer “no” to “Will you make Twitter content or derived information available to a government entity or a government affiliated entity?”. Heads up, before your developer account can be created, you will need to verify an email and phone number.
Once you have created your account, you should see a screen similar to this one.
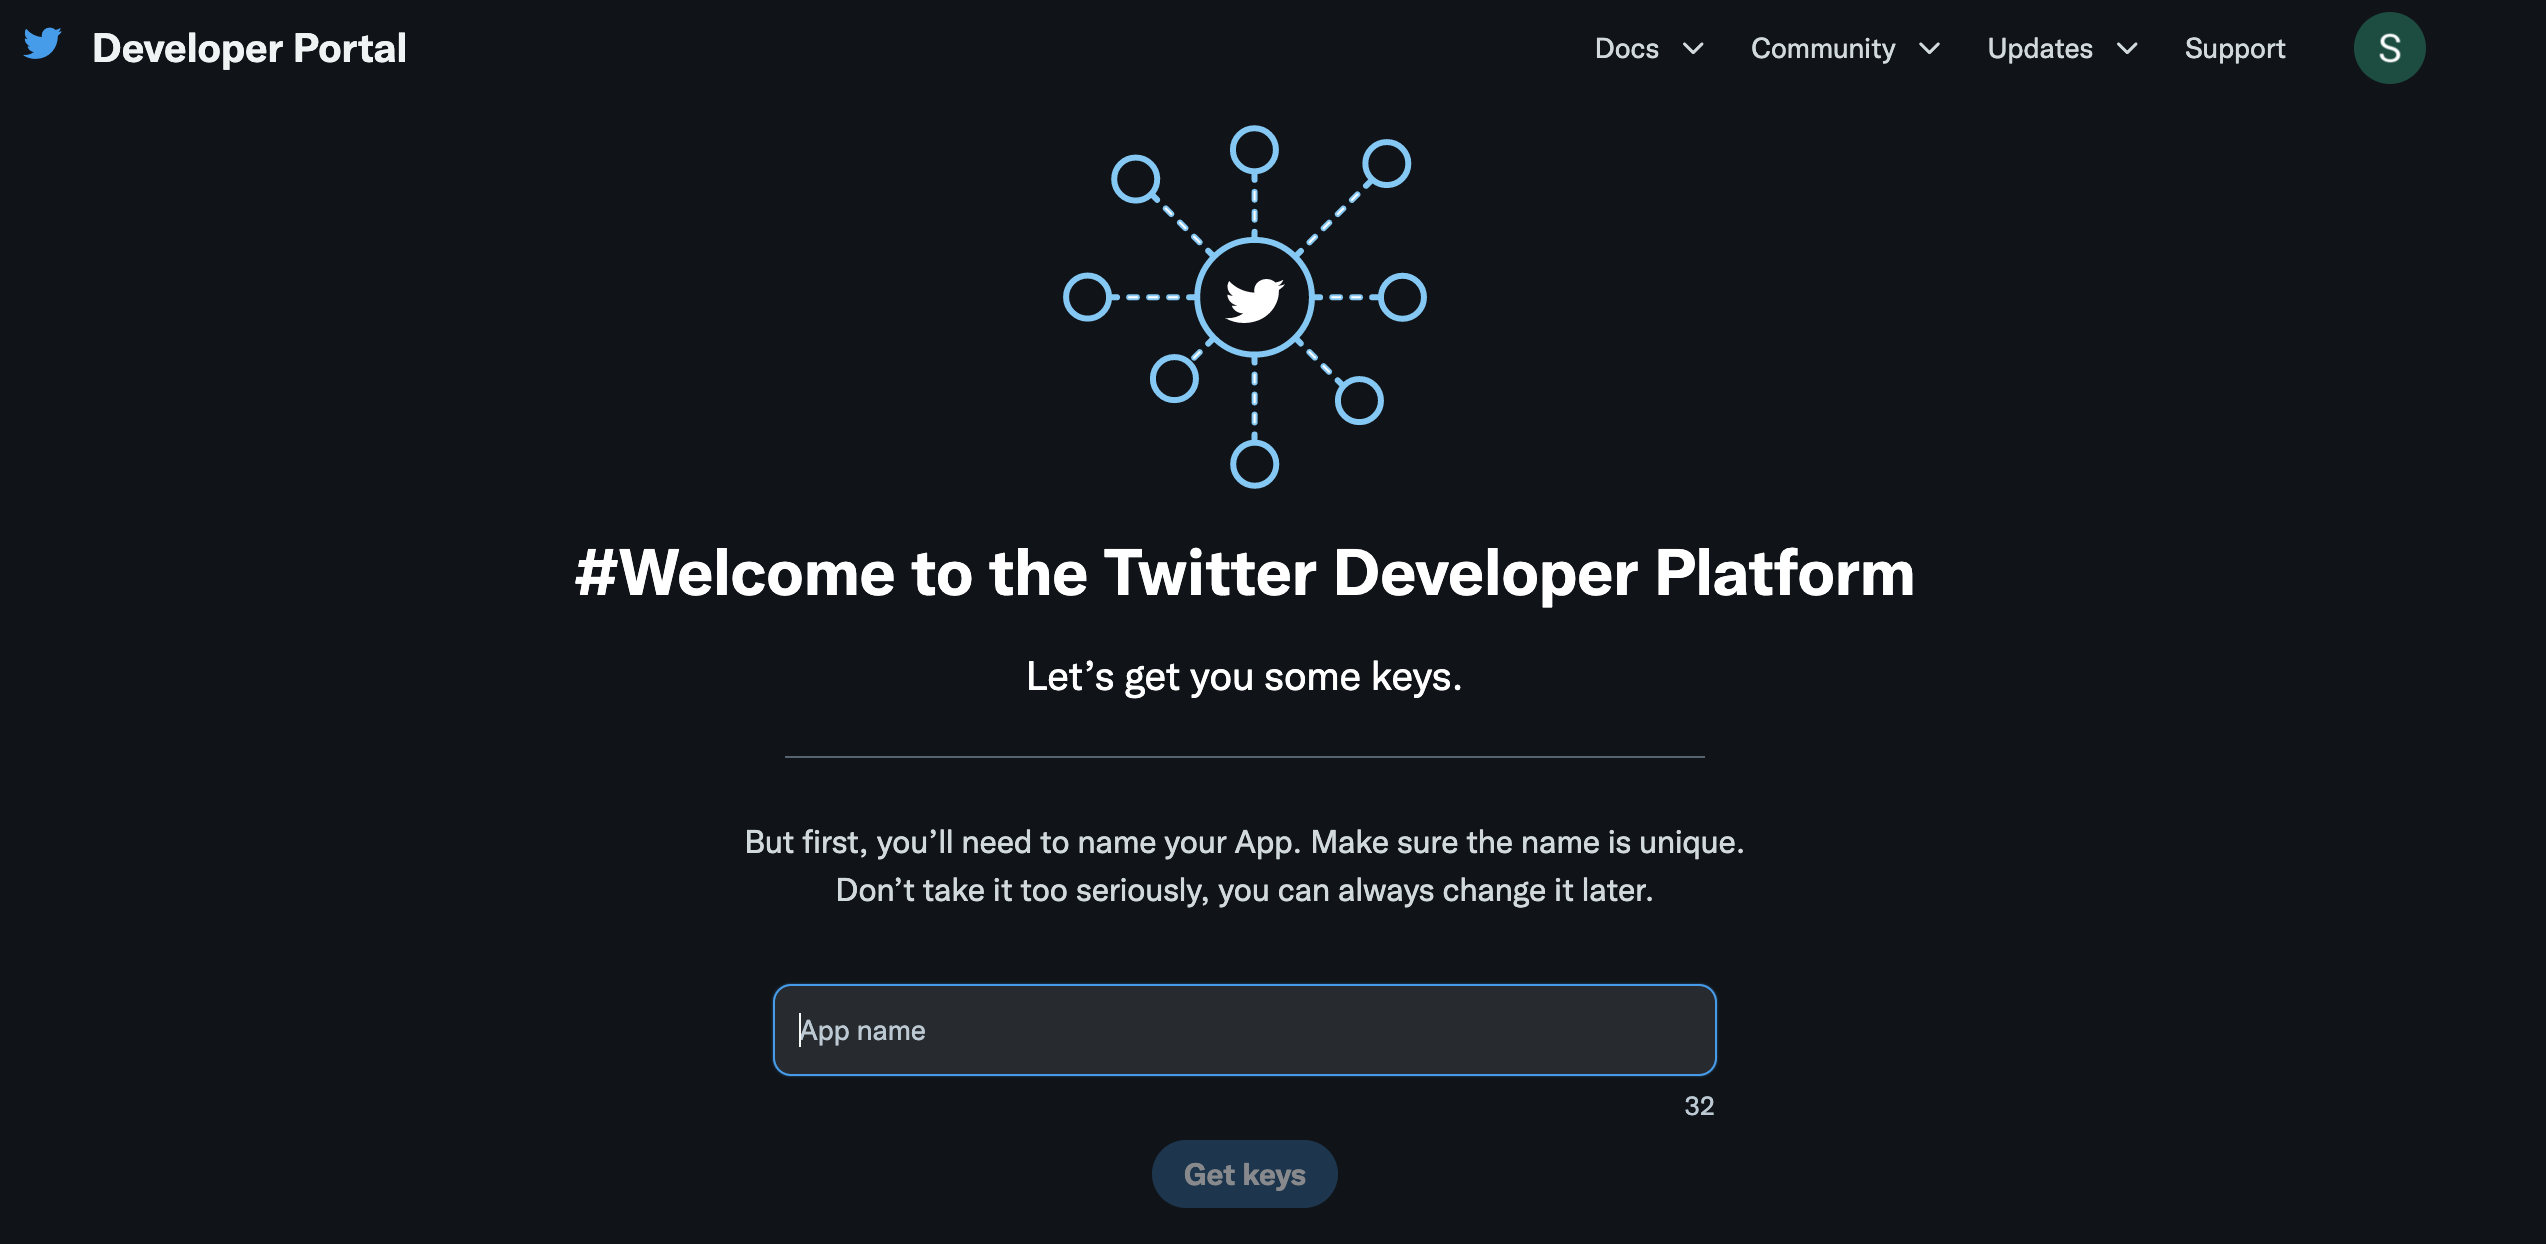
Name your app and hit “Get Keys”. Save your keys in a secure location that you will remember. The easiest location would be a .env file in your project directory.
We have successfully created a developer account, but we still need elevated access in order to use the Twitter API v2. Let’s do that now.
Go to your Developer Dashboard. Under Products click on Twitter API v2. Click on the Elevated tab and then click Apply.

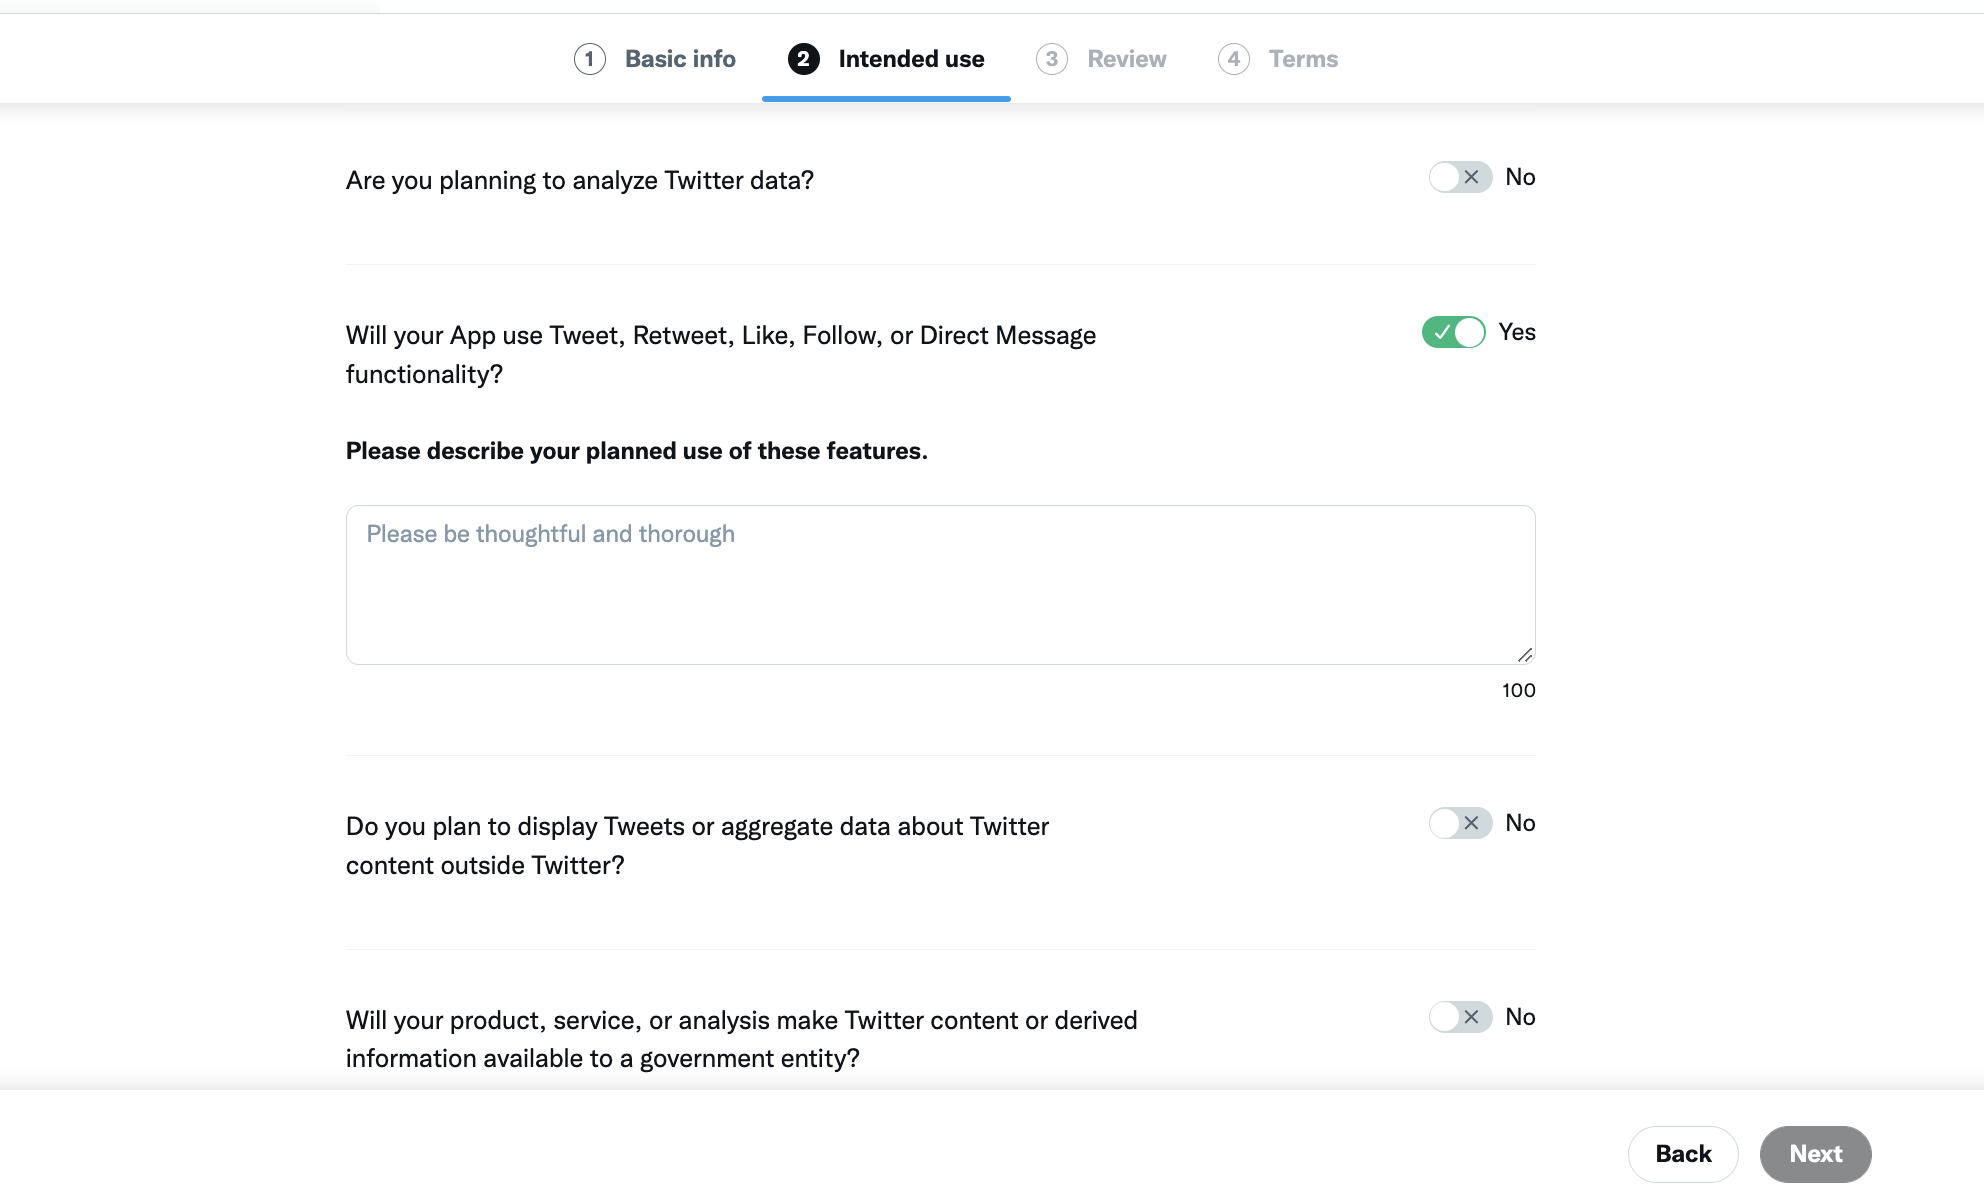
Fill out the first section with your information. When you get to the “Intended Use” section, fill it out truthfully. Explain that you will be creating a simple bot that will post images daily and respond to users. Maybe add in why you are interested in learning how to use the Twitter API. The better your response, the quicker you will be approved, but also don’t stress too much about it. I wrote something short and sweet and got approved instantly.
Answer no to all the questions except the one about liking messages. Fill out your intended use of this feature. For this tutorial, our bot will like mentions and respond to them. If you want to expand your bot’s functionality, mention that here. Click through the Review and Terms and you should be approved instantly or relatively quickly.
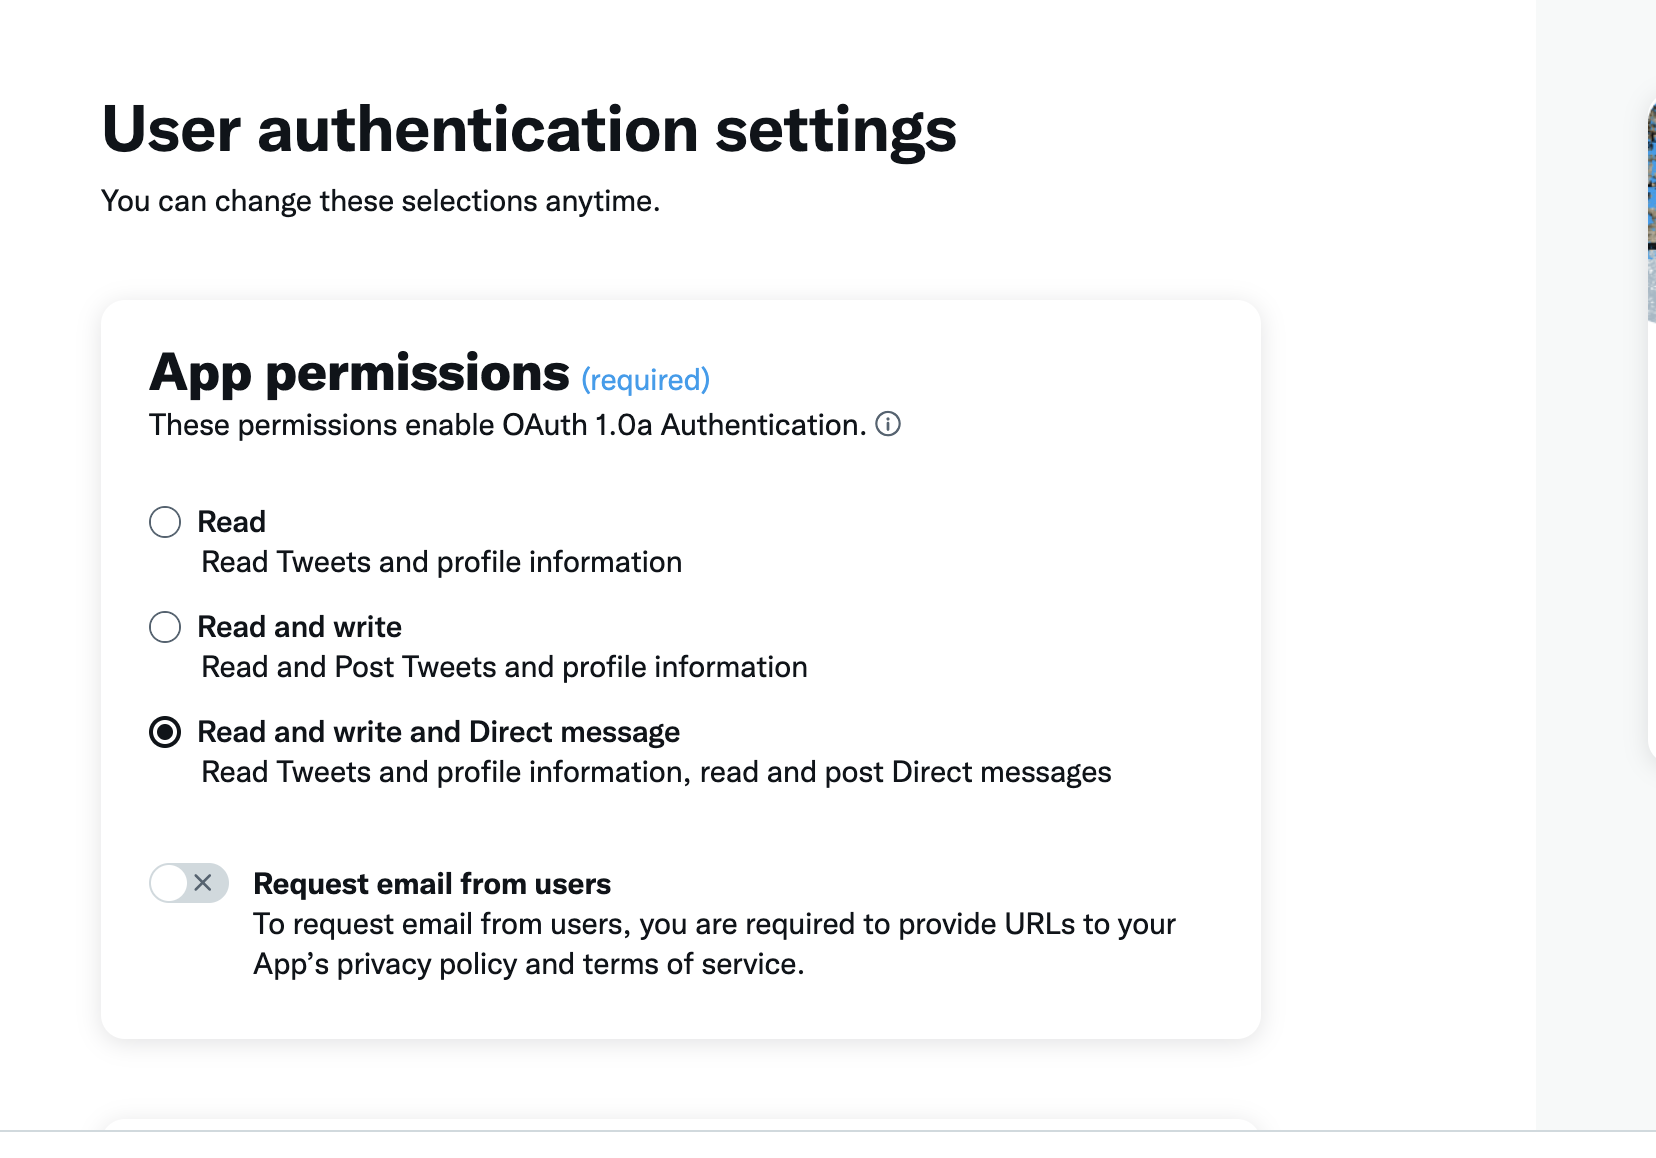
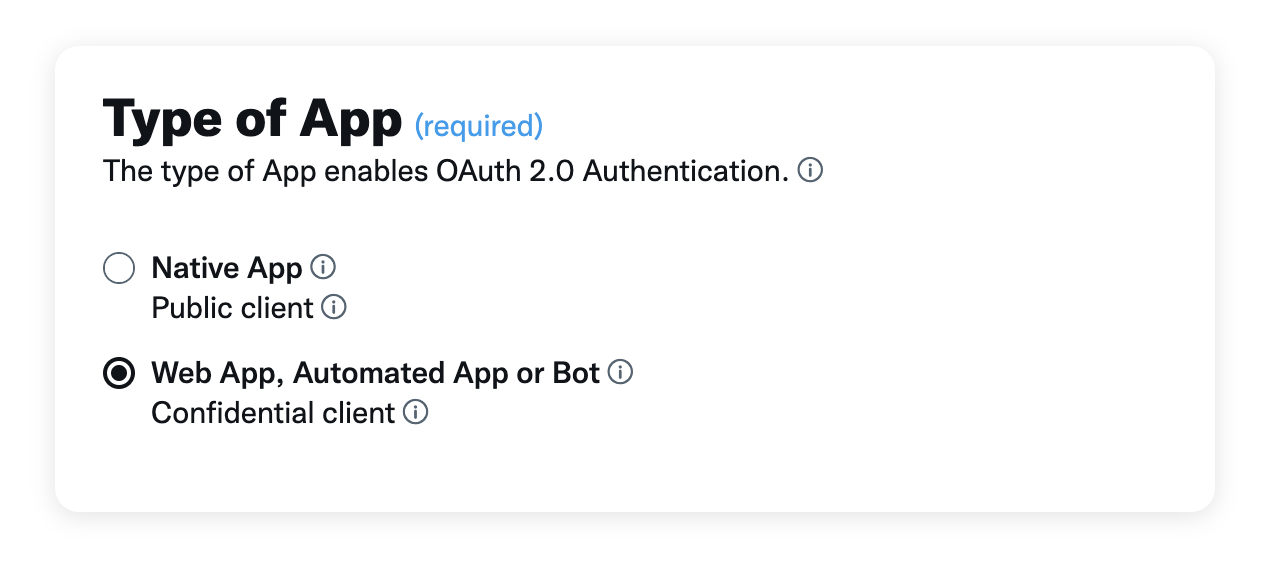
Now, we finally have the correct permissions. Only one more step to go and we can get coding. We need to edit our user authentication settings to “read and write and Direct message”. Underneath Projects & Apps in the left sidebar click on the name of your project. Click settings and scroll down to User Authentication Settings and click “Set Up”.

Change your App permissions to “Read and write and Direct message”. Match the rest of the settings to the following screenshots.
Make sure to replace my username with your bot’s username.

Phew!! All that before even coding. Hopefully that all made sense. If so, we are ready to move on to the fun part, the coding of the bot!
Project Layout and constants.py
Create a folder to house your repository and project. Create the following files in your project folder.
├── application.py
├── constants.py
├── daily_post.py
├── get_assets.py
├── last_mention_id.txt
├── publish.py
├── respond.py
Open constants.py. This is where you will house your credentials and other constants, such as endpoints and file names. This isn’t necessary, but it’s a step I included to reduce typing later on and to make changes across files easier. Return to your terminal and save your keys to your os by using the following command or your preferred method:
export CONSUMER_KEY='YOUR TOKEN HERE'
Do that for all of your keys naming them (CONSUMER_KEY, CLIENT_SECRET, ACCESS_TOKEN, and ACCESS_TOKEN_SECRET).
The rest of the constants are:
import os

# File information
IMAGE_FILENAME = './shiba.jpg'
ID_FILE = "last_mention_id.txt"

# Bot username
USERNAME = "YOUR USERNAME HERE"

# Twitter API Endpoints
# Chunk uploading enpoint used for INIT - FINALIZE
MEDIA_UPLOAD_ENDPOINT = 'https://upload.twitter.com/1.1/media/upload.json'
POST_TWEET_ENDPOINT = 'https://api.twitter.com/1.1/statuses/update.json'
USERS_ENDPOINT = "https://api.twitter.com/2/users"

# Twitter API vars
CONSUMER_KEY = os.environ.get("API_KEY")
CLIENT_SECRET = os.environ.get("API_KEY_SECRET")
ACCESS_TOKEN = os.environ.get("ACCESS_TOKEN")
ACCESS_TOKEN_SECRET = os.environ.get("ACCESS_TOKEN_SECRET")
Fetching the Shiba Inu and Quote (get_assets.py)
Go into get_assets.py and import the requests library and the json library.
First, we will fetch our Shiba Inu image. If you'd like to write that code on your own, the API endpoint is https://shibe.online/api/shibes?count=1&urls=true&httpsUrls=true. All you need to do is fetch that image and then save it in your folder under the name shiba.jpg.
To do this, I used a try except statement to fetch the image. The url and image extension was then parsed. Another fetch was made to the parsed image url that the Shibe API reutrned. This image was then saved as shiba.jpg. Call the function and test it out to make sure everything is working properly.
def fetch_shiba():
    # Get the Shiba Inu image url from the Shibe API
    shiba_api = "http://shibe.online/api/shibes?count=1&urls=true&httpsUrls=true"
    print("Fetching shiba")
    try:
        res = requests.get(shiba_api)
    except:
        print("Error while calling API")

    # Parse the results and extract the url and image extension
    print("Image successfully fetched")
    data = res.text
    parsed_url = json.loads(data)[0]
    image_extension = parsed_url.split('.')[-1]

    # Download the shiba image to later upload as media and tweet
    img_data = requests.get(parsed_url).content
    with open('shiba.' + image_extension, 'wb') as handler:
        handler.write(img_data)
We are going to do pretty much the same thing to fetch the quote from this endpoint https://zenquotes.io/api/random. Your code might look like this:
def fetch_quote():
    # Get the inspirational quote from the quote API
    quote_api = "https://zenquotes.io/api/random"

    print("Fetching quote")
    try:
        res = requests.get(quote_api)
    except:
        print("Error while calling API")

    # Parse the results and return quote and author
    data = res.json()[0]
    print("Quote successfully fetched.")
    return {'quote': data['q'], 'author': data['a']}
Now that you have your assets, go ahead and import and add these functions to a post function in your daily_post.py file. daily_post will host our main function that the flask operation will call.
import get_assets
from constants import IMAGE_FILENAME as img_file

def post():
    # Updates the local file ./shiba.jpg to be used in the tweet
    get_assets.fetch_shiba()
    # Gets the inspirational quote and author from the API
    quote_data = get_assets.fetch_quote()
    quote = quote_data["quote"]
    author = quote_data["author"]

if __name__ == "__main__":
    post()

Uploading an Image and Publishing Your First Tweet (publish.py)
By this point you should be able to successfully fetch a Shiba Inu image and a random quote. Now, we need to use the Twitter API to publish a tweet with those assets! 🌼
Open publish.py. Import the following libraries and files:
import os
import sys
import time
import json
import requests
import constants as const
from requests_oauthlib import OAuth1
In order to use the Twitter API, we need to verify that we are an authorized user. To do that you will use OAuth1 and your keys that you should have save to your OS or a .env earlier.
oauth = OAuth1(const.CONSUMER_KEY,
               client_secret=const.CLIENT_SECRET,
               resource_owner_key=const.ACCESS_TOKEN,
               resource_owner_secret=const.ACCESS_TOKEN_SECRET)
In order to post a tweet with an image we need to upload that image and also get the returned media_id. In this tutorial we are going to use the chunk upload method. This is the method recommended by Twitter and new features will only be supported for the chunked upload endpoint.
The chunk upload process consists of three steps: INIT, APPEND, and FINALIZE. If you have questions about the chunk uploading, check out this short tutorial by Twitter. For this process, we will create and utilize a class called ImageTweet. This class will have four functions, one for each of the chunk uploading steps and one to check the status of the uploading process. Create the class first.
class ImageTweet(object):

    def __init__(self, file_name):
        # Defines image tweet properties
        self.image_filename = file_name
        self.total_bytes = os.path.getsize(self.image_filename)
        self.media_id = None
        self.processing_info = None
Now, let's create our four functions within the ImageTweet class. The INIT function is pretty straightforward. This function starts the upload process and returns the all important media_id. This id is necessary for our the rest of our functions to work. Here is an example request from Twitter to help you visualize what we will be sending over in our request_data dictionary.
POST https://upload.twitter.com/1.1/media/upload.json?command=INIT&total_bytes=10240&media_type=image/jpeg
    def upload_init(self):
        # Initializes upload
        print('INIT')

        request_data = {
            'command': 'INIT',
            'media_type': 'image/jpg',
            'total_bytes': self.total_bytes,
            'media_category': 'tweet_image'
        }

        req = requests.post(url=const.MEDIA_UPLOAD_ENDPOINT,
                            data=request_data, auth=oauth)

        print(req.json())
        media_id = req.json()['media_id']

        self.media_id = media_id

        print('Media ID: %s' % str(media_id))
After initiating the file upload session, it's time to start the APPEND process. Chunk uploading is exactly what it sounds like, splitting a file into chunks and then uploading those chunks. Chunk uploading is recommended by Twitter because it has better success rates under bad network conditions, uploads can be paused and then resumed, and file chunks can be retried individually. We will be sending over quite a few parameters so let's break down some of them.
segment_index- This is a required parameter that is the ordered index of the file chunk. The first segment has index of 0 and goes on until 999. So if you have a 5MB file (the max file size) that was split into 5 chunks with a size of 1MB, that first chunk will havesegment_indexof 0.media- While the bytes sent is less than the bytes of the image, chunks of the file will be uploaded along with thesegment_indexas mentioned above.
 def upload_append(self):
        segment_id = 0
        bytes_sent = 0
        file = open(self.image_filename, 'rb')

        while bytes_sent < self.total_bytes:
            chunk = file.read(4*1024*1024)

            print('APPEND')

            request_data = {
                'command': 'APPEND',
                'media_id': self.media_id,
                'segment_index': segment_id
            }

            files = {
                'media': chunk
            }

            req = requests.post(url=const.MEDIA_UPLOAD_ENDPOINT,
                                data=request_data, files=files, auth=oauth)

            if req.status_code < 200 or req.status_code > 299:
                print(req.status_code)
                print(req.text)
                sys.exit(0)

            segment_id = segment_id + 1
            bytes_sent = file.tell()

            print('%s of %s bytes uploaded' %
                  (str(bytes_sent), str(self.total_bytes)))

        print('Upload chunks complete.')
After the entire media file is uploaded using the function above, the finalize function can be called. If everything works out, after calling the finalize function you should have your media_id returned and an uploaded image! Let's create the finalize function and check status function now. The check_status is just used to periodically check for updates of the media processing operation. The response to this endpoint returns processing_info which contains a state field. If we have a state of success, great, we can move on and upload our tweet. If we have a failed state, the program will exit.
    def upload_finalize(self):
        # Finalizes uploads and starts image processing
        print('FINALIZE')

        request_data = {
            'command': 'FINALIZE',
            'media_id': self.media_id
        }

        req = requests.post(url=const.MEDIA_UPLOAD_ENDPOINT,
                            data=request_data, auth=oauth)

        print(req.json())

        self.processing_info = req.json().get('processing_info', None)
        self.check_status()
        return self.media_id

    def check_status(self):
        # Checks image processing status

        if self.processing_info is None:
            return

        state = self.processing_info['state']

        print('Media processing status is %s ' % state)

        if state == u'succeeded':
            return

        if state == u'failed':
            sys.exit(0)

        check_after_secs = self.processing_info['check_after_secs']

        print('Checking after %s seconds' % str(check_after_secs))
        time.sleep(check_after_secs)

        print('STATUS')

        request_params = {
            'command': 'STATUS',
            'media_id': self.media_id
        }

        req = requests.get(url=const.MEDIA_UPLOAD_ENDPOINT,
                           params=request_params, auth=oauth)

        self.processing_info = req.json().get('processing_info', None)
        self.check_status()
In case you missed a few steps or I was confusing here is the full ImageTweet Code.
class ImageTweet(object):

    def __init__(self, file_name):
        # Defines image tweet properties
        self.image_filename = file_name
        self.total_bytes = os.path.getsize(self.image_filename)
        self.media_id = None
        self.processing_info = None

    def upload_init(self):
        # Initializes upload
        print('INIT')

        request_data = {
            'command': 'INIT',
            'media_type': 'image/jpg',
            'total_bytes': self.total_bytes,
            'media_category': 'tweet_image'
        }

        req = requests.post(url=const.MEDIA_UPLOAD_ENDPOINT,
                            data=request_data, auth=oauth)

        print(req.json())
        media_id = req.json()['media_id']

        self.media_id = media_id

        print('Media ID: %s' % str(media_id))

    def upload_append(self):
        # Uploads media in chunks and appends to chunks uploaded
        segment_id = 0
        bytes_sent = 0
        file = open(self.image_filename, 'rb')

        while bytes_sent < self.total_bytes:
            chunk = file.read(4*1024*1024)

            print('APPEND')

            request_data = {
                'command': 'APPEND',
                'media_id': self.media_id,
                'segment_index': segment_id
            }

            files = {
                'media': chunk
            }

            req = requests.post(url=const.MEDIA_UPLOAD_ENDPOINT,
                                data=request_data, files=files, auth=oauth)

            if req.status_code < 200 or req.status_code > 299:
                print(req.status_code)
                print(req.text)
                sys.exit(0)

            segment_id = segment_id + 1
            bytes_sent = file.tell()

            print('%s of %s bytes uploaded' %
                  (str(bytes_sent), str(self.total_bytes)))

        print('Upload chunks complete.')

    def upload_finalize(self):
        # Finalizes uploads and starts image processing
        print('FINALIZE')

        request_data = {
            'command': 'FINALIZE',
            'media_id': self.media_id
        }

        req = requests.post(url=const.MEDIA_UPLOAD_ENDPOINT,
                            data=request_data, auth=oauth)

        print(req.json())

        self.processing_info = req.json().get('processing_info', None)
        self.check_status()
        return self.media_id

    def check_status(self):
        # Checks image processing status

        if self.processing_info is None:
            return

        state = self.processing_info['state']

        print('Media processing status is %s ' % state)

        if state == u'succeeded':
            return

        if state == u'failed':
            sys.exit(0)

        check_after_secs = self.processing_info['check_after_secs']

        print('Checking after %s seconds' % str(check_after_secs))
        time.sleep(check_after_secs)

        print('STATUS')

        request_params = {
            'command': 'STATUS',
            'media_id': self.media_id
        }

        req = requests.get(url=const.MEDIA_UPLOAD_ENDPOINT,
                           params=request_params, auth=oauth)

        self.processing_info = req.json().get('processing_info', None)
        self.check_status()

Posting a tweet (publish.py and daily_post.py)
Alright, let's get your first tweet published! Posting a tweet is much easier that uploading an image. In your publish.py file, create the following tweet function.
def tweet(quote, author, media_id, text=""):
    request_data = {
        'status': f'{text}\n"{quote}"\n{author}',
        'media_ids': media_id
    }
    print("Publishing Tweet...")
    req = requests.post(url=const.POST_TWEET_ENDPOINT, data=request_data, auth=oauth)
    print("Tweet Published")
This function will take the quote and author from our fetch_quote function from earlier, the media_id we just worked so hard to get, and an optional text parameter (we'll use this when responding to tweets later). Now, let's put it all together in daily_post.py! Test out your program by running python3 daily_post.py. Are you getting any errors or did you post your first tweet in your terminal?
def post():
    # Updates the local file ./shiba.jpg to be used in the tweet
    get_assets.fetch_shiba()
    # Gets the inspirational quote and author from the API
    quote_data = get_assets.fetch_quote()
    quote = quote_data["quote"]
    author = quote_data["author"]
    # Starts the image uploading and tweet process.
    image = publish.ImageTweet(img_file)
    image.upload_init()
    image.upload_append()
    media_id = image.upload_finalize()
    # Tweets the image and quote + author
    publish.tweet(quote, author, media_id)

if __name__ == "__main__":
    post()

Responding to Mentions (respond.py)
This is a completely optional bot feature. If you are happy with just posting an image or quote every 24hrs, skip to the hosting and automation portions. If you'd like to know how to respond to people when they mention you, keep reading. 🐶
Open respond.py and import the following files and libraries and authenticate yourself as before using OAuth1.
import requests
from requests_oauthlib import OAuth1
import get_assets
import publish
import constants as const

# Authenticate the connection
oauth = OAuth1(const.CONSUMER_KEY,
               client_secret=const.CLIENT_SECRET,
               resource_owner_key=const.ACCESS_TOKEN,
               resource_owner_secret=const.ACCESS_TOKEN_SECRET)
In order to respond to mentions, you will need to get your user ID from the usernames endpoint, get the author's username to "@" them and like the tweet, and store the last mention id in a local txt file to use later. Sounds like a lot, but let's get into and break it down.
Let's first get our own user ID to look up the mentions associated with the account. Make a request to this endpoint: https://api.twitter.com/2/users/by/username/:username to get your user ID.
# Get user ID to use to look up mentions
def get_user_id():
    req = requests.get(
        url=f"{const.USERS_ENDPOINT}/by?usernames={const.USERNAME}", auth=oauth)

    res = req.json()
    user_id = res["data"][0]["id"]

    return user_id
Now that we have the user ID we can get the mentions using this endpoint: https://api.twitter.com/2/users/:id/mentions. This endpoint will return everything we need; the author_id of the user who tweeted at the bot, the id of the actual tweet (so we can like it later), and the newest_id (the id of the most recent tweet at our bot. We need this newest_id in order to save it to our txt file so we can create a function later on that accesses this txt file and adds it as a parameter to the req link to avoid duplicate replies to people.
Let's create those functions now. You should have a file created already titled last_mention_id.txt. If not, create it now. We need one mention to get that id from the txt file and one to save the new id we'll get from the endpoint above.
# Saves the latest mention_id to txt file
def save_mention_id(id):
    f = open(const.ID_FILE, "w")
    f.write(str(id))
    f.close()
    print("File updated with latest mention ID")
    return

# Retrieves the id from the last time the script ran
def get_mention_id():
    f = open(const.ID_FILE, "r")
    # Strip removes any whitespace from beginning and end of the string
    last_id = f.read().strip()
    f.close()
    return last_id
Now, create a respond_to_mentions function. We need to add a couple parameters to the endpoint above. since_id will help us avoid duplicate replies by using the tweet id we will save each time our bot responds to someone. expansions=author_id is necessary in order for us to get the user's username later.
# Get all new mentions
def respond_to_mentions(user_id):
    last_id = get_mention_id()
    # since_id returns results with tweet ID that is more recent than last_id
    # Adding the expansions is necessary to get the author ids
    req = requests.get(
        url=f"{const.USERS_ENDPOINT}/{user_id}/mentions?since_id={last_id}&expansions=author_id", auth=oauth)

    res = req.json()

    length = res["meta"]["result_count"]

    # If no new mentions return
    if length == 0:
        print("No new mentions")
        return

    mentions = res["data"]
Let's create the functions for getting the author's username and liking the tweet now. Getting the username is very similar to the function we made for getting the user ID earlier. Liking the tweet is as simple as making a call to the likes endpoint and sending the tweet_id that we got earlier.
# Takes author_id and returns username
def get_username(id):
    req = requests.get(
        url=f"{const.USERS_ENDPOINT}/{id}", auth=oauth)
    res = req.json()
    username = res["data"]["username"]
    return username

def like_tweet(tweet, user_id):
    print("Liking Tweet...")

    tweet_id = str(tweet["id"])
    request_data = {
        'tweet_id': tweet_id
    }

    req = requests.post(url=f"{const.USERS_ENDPOINT}/{user_id}/likes", json=request_data, auth=oauth)
    print("Tweet Like Successful: ", req.json()["data"]["liked"])
Our respond_to_mentions function is still incomplete. Try your hand at creating a for loop of the reversed order of the mentions (so the oldest tweets get replied to first) that gets the username of the author, likes the tweet, gets your assets, uploads the image assets, and publishes the tweet. Don't forget to save the newest mention id in the txt file after the loop.
Here is what my final code looks like.
import requests
from requests_oauthlib import OAuth1
import get_assets
import publish
import constants as const

# Authenticate the connection
oauth = OAuth1(const.CONSUMER_KEY,
               client_secret=const.CLIENT_SECRET,
               resource_owner_key=const.ACCESS_TOKEN,
               resource_owner_secret=const.ACCESS_TOKEN_SECRET)

# Saves the latest mention_id to txt file
def save_mention_id(id):
    f = open(const.ID_FILE, "w")
    f.write(str(id))
    f.close()
    print("File updated with latest mention ID")
    return

# Retrieves the id from the last time the script ran
def get_mention_id():
    f = open(const.ID_FILE, "r")
    # Strip removes any whitespace from beginning and end of the string
    last_id = f.read().strip()
    f.close()
    return last_id

# Get user ID to use to look up mentions
def get_user_id():
    req = requests.get(
        url=f"{const.USERS_ENDPOINT}/by?usernames={const.USERNAME}", auth=oauth)

    res = req.json()
    user_id = res["data"][0]["id"]

    return user_id

# Takes author_id and returns username
def get_username(id):
    req = requests.get(
        url=f"{const.USERS_ENDPOINT}/{id}", auth=oauth)
    res = req.json()
    username = res["data"]["username"]
    return username

def like_tweet(tweet, user_id):
    print("Liking Tweet...")

    tweet_id = str(tweet["id"])
    request_data = {
        'tweet_id': tweet_id
    }

    req = requests.post(url=f"{const.USERS_ENDPOINT}/{user_id}/likes", json=request_data, auth=oauth)
    print("Tweet Like Successful: ", req.json()["data"]["liked"])

# Get all new mentions
def respond_to_mentions(user_id):
    last_id = get_mention_id()
    # since_id returns results with tweet ID that is more recent than last_id
    # Adding the expansions is necessary to get the author ids
    req = requests.get(
        url=f"{const.USERS_ENDPOINT}/{user_id}/mentions?since_id={last_id}&expansions=author_id", auth=oauth)

    res = req.json()

    length = res["meta"]["result_count"]

    # If no new mentions return
    if length == 0:
        print("No new mentions")
        return

    mentions = res["data"]

    # Reverse the order so the oldest tweets get replied to first
    for mention in reversed(mentions):
        author_id =  mention["author_id"]
        # Get username to respond to
        mention_username = get_username(author_id)

        # Like tweet - need the mention id and your own user_id gathered previously
        like_tweet(mention, user_id)
        # Generate new image
        get_assets.fetch_shiba()

        # Get Quote
        quote_data = get_assets.fetch_quote()
        quote = quote_data["quote"]
        author = quote_data["author"]

        text = f"@{mention_username} bork bork!"

        # Start the image uploading process
        image = publish.ImageTweet(const.IMAGE_FILENAME)
        image.upload_init()
        image.upload_append()
        media_id = image.upload_finalize()
        # Tweets the image and quote + author @the_user
        publish.tweet(quote, author, media_id, text)

    # Save the newest id in a txt file to be used the next time the script runs to avoid repeated mentions
    new_id = res["meta"]["newest_id"]
    save_mention_id(new_id)
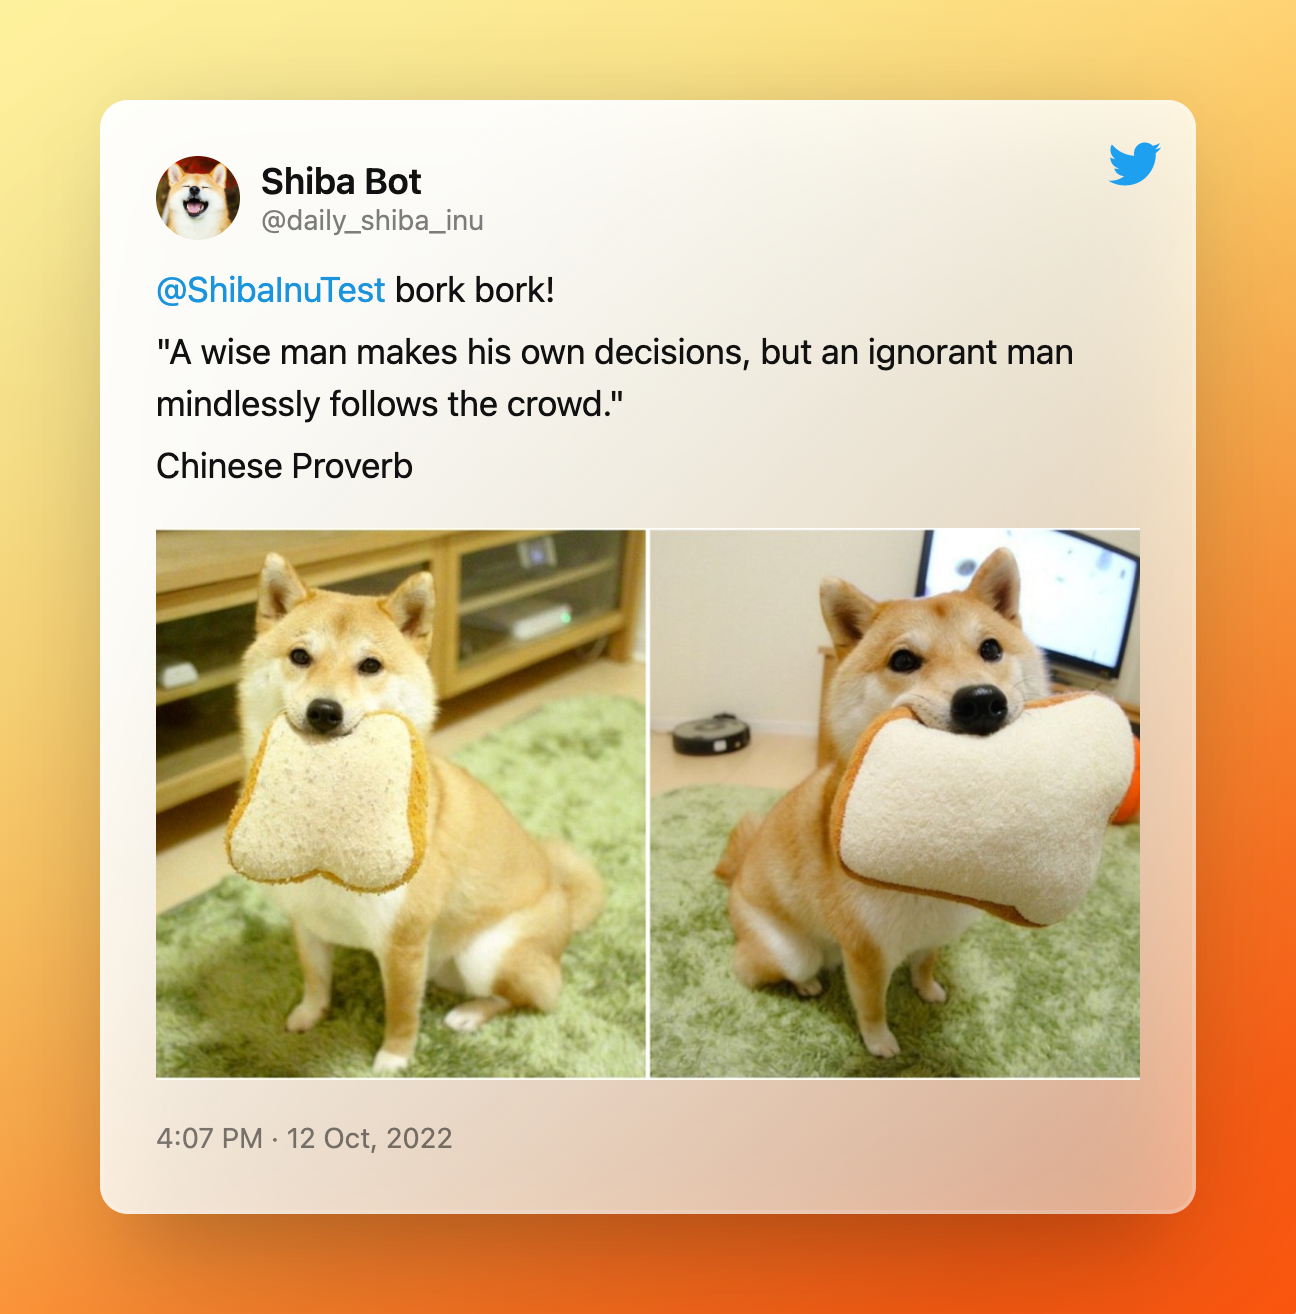
If you used the above code, your result should look like this:
Creating a Flask Application and adding Automation (application.py)
I will be honest here, I am no AWS expert and this was my first Flask application. I relied heavily on this great tutorial for the Flask code. So, check out that guide if you have any questions. Flask is an awesome framework that allows you to quickly whip up a web application with just a single Python file.
To get started, import the following files and libraries:
from flask import Flask
import daily_post
import respond
import atexit
from apscheduler.schedulers.background import BackgroundScheduler
Now, we need to import the Flask object and create an application instance titled application. We also need to create a function that will return an HTTP response. You can do that with @application.route, a decorator that will turn a regular Python function into a Flask view function. This will convert the the return value of the function into an HTTP response.
application = Flask(__name__)
@application.route("/")
We've got the basics of a Flask app, now we need to add some functions to automate our bot.
def index():
    return "Follow @daily_shiba_inu!"


def post():
    daily_post.post()
    print("Success!")

def reply():
    user_id = respond.get_user_id()
    respond.respond_to_mentions(user_id)
The index function will just be a quick indicator of whether your bot is working correctly on AWS. The other functions will post a tweet daily or respond to mentions, but these aren't automated yet. Add the following code to schedule these events.
scheduler = BackgroundScheduler()
# Run the main application once every day
scheduler.add_job(func=post, trigger="interval", days=1)
# Run the respond function once every 5 minutes
scheduler.add_job(func=reply, trigger="interval", minutes=5)
scheduler.start()

atexit.register(lambda: scheduler.shutdown())

if __name__ == "__main__":
    application.run(port=5000, debug=True)
The apscheduler library will run the functions according to the intervals you provide. You can test your Flask app locally by running this command:
python3 ./application.py
If your code is correct, your bot should have posted a tweet. Try tweeting at your bot to see if the respond function is working correctly.

Hosting the Bot on AWS
Finally, we are at the last section of this tutorial! 👏 Hopefully, your code is working and you've taken a couple of brain breaks. This last section should be one of the simplest, it's all about hosting your hard work!
Sign into your AWS account and search for "Elastic Beanstalk". Click "Create Application". You will be asked to provide four things.
An application name
Application tags, not required but useful if you have lots of environments
Platform, we will be selected Python
Application code
Select Python from the platform dropdown. This will auto populate the "platform branch" and "version".
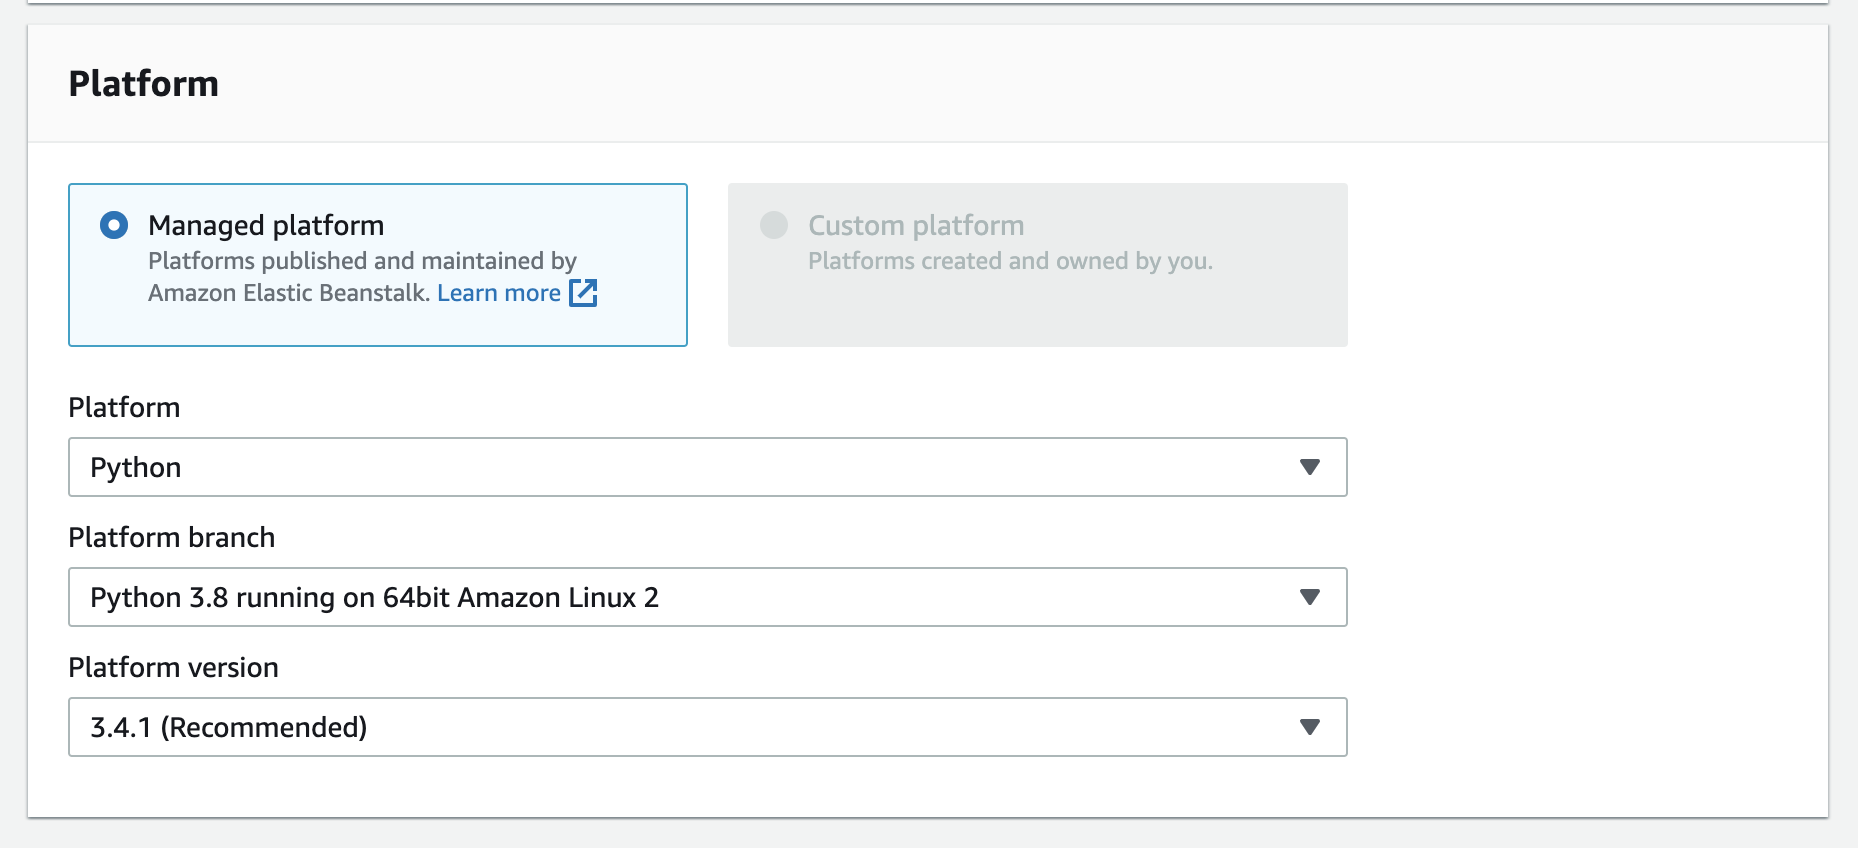
You will upload your application code later, so for now, just keep the "sample application" selected. Hit "Create Application" and watch your environment be created. This may take a few minutes.
While the application is being created, we need to add Elastic Beanstalk configuration files (.ebextensions). Create a folder titled .ebextensions and create a new file titled python.config in that folder. Paste the code below into the config file.
files:
  "/etc/httpd/conf.d/wsgi_custom.conf":
    mode: "000644"
    owner: root
    group: root
    content: WSGIApplicationGroup %{GLOBAL}
In order for Elastic Beanstalk to configure the environment for your application, you will also need to create a requirements.txt file. This will contain all the external Python libraries your project used.
Run this command to create the requirements file:
bash pip freeze > requirements.txt
To upload the flask app on Elastic Beanstalk, you will need to zip all the file together. There is a specific way to zip your files that AWS likes. You will need to create a source bundle from the command line. Use the following command to zip your files up including hidden files and folders:
~/twitterBot$ zip ../twitterBot.zip -r * .[^.]*
Now, return to your AWS application and click on "Upload and Deploy". Choose your zip file and click deploy. If everything goes according to plan, the health symbol will turn green and your website link should take you to a page that says Follow @your_bots_name_here!.

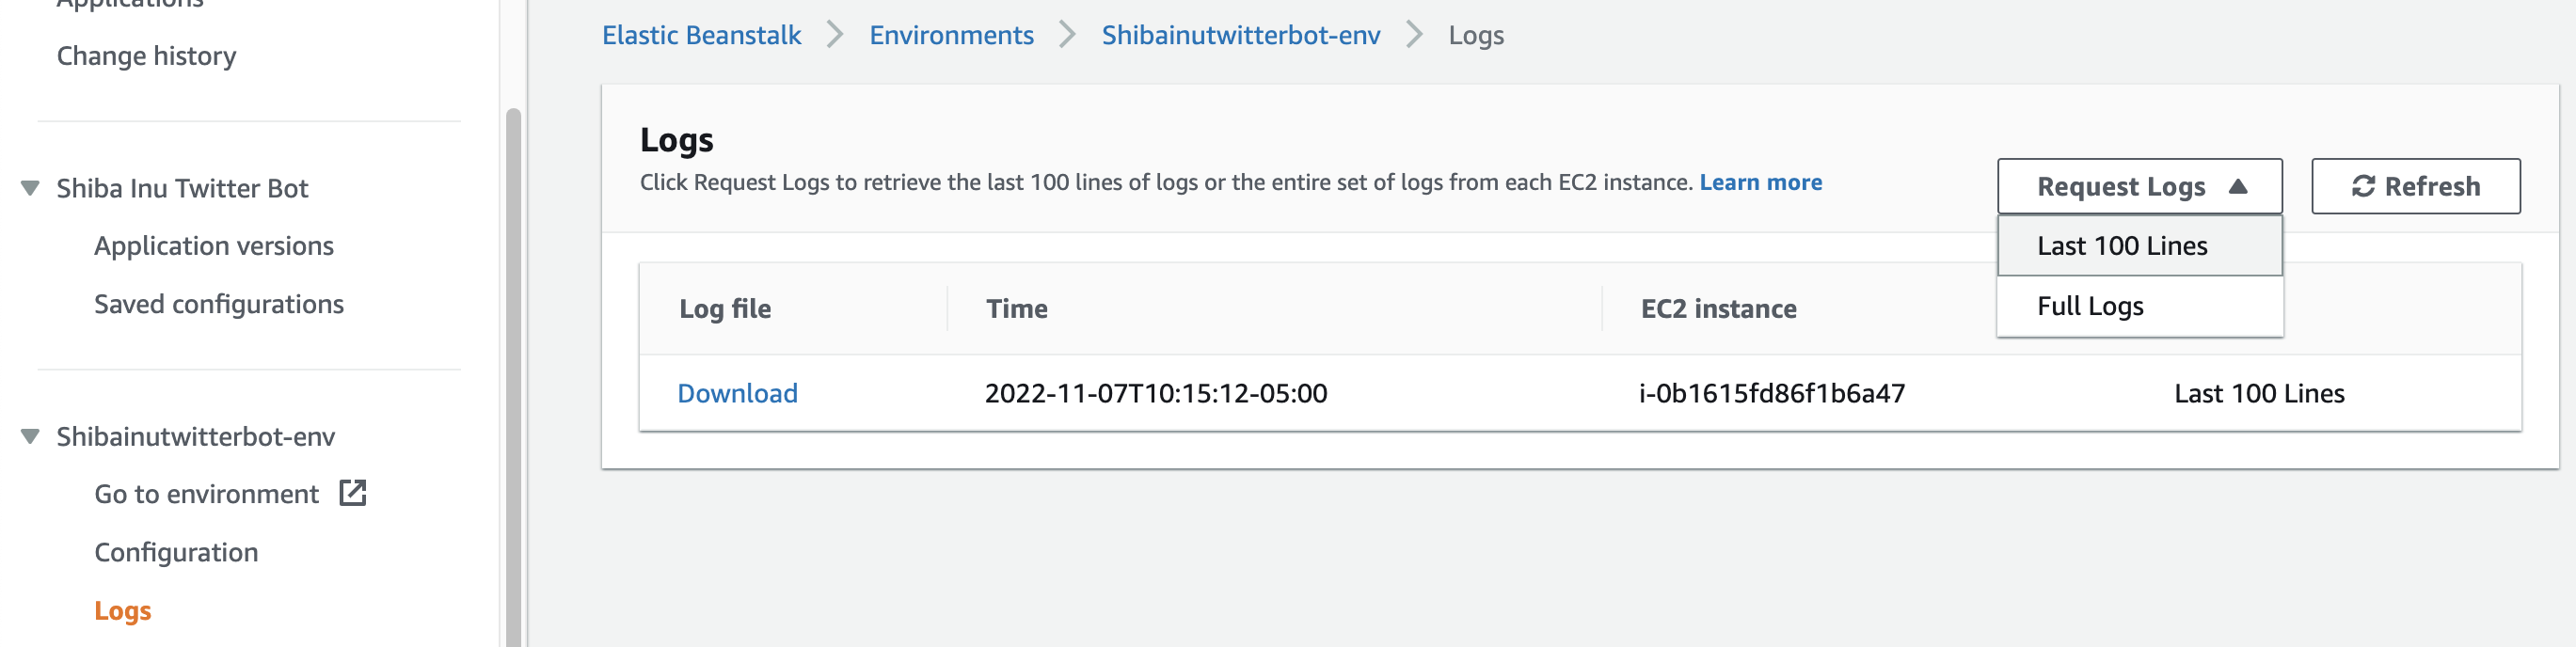
If your deployment was unsuccessful, don't fret. You can debug your application by going to the error logs. Click on "Logs" on the left-side menu and request the last 100 lines. The last 100 is usually all you will need for debugging but you will also have the option to download the full logs.
If your deployment was successful, your bot is now up and running! 💪 If you scheduled your bot to post every 24hrs it should have tweeted after being deployed. Try testing the mentions feature of your bot as well.
The Twitter API has some cool capabilities and I really enjoyed creating this bot, so hopefully Elon doesn't restrict or get rid of the API before you can use it.
If you used this tutorial, comment below with the username of your bot! And of course, tweet @daily_shiba_inu for some cute inspiration and wisdom.
⭐️ You can also fork or clone this repo on Github if you'd like to play with the source code.
Thanks for reading! 🐶✨


